
Backups are supposed to be your last line of defense in case of data loss – but what happens when you delete your backups? Fortunately, your files aren’t gone forever… At least not yet. To recover your iCloud backup, you have to act quickly. The longer you wait, the more likely your data will get overwritten.
In this article, we’ll teach you 3 ways to recover files deleted from your iCloud backup. We’ll also cover how files are stored and deleted in iCloud and where to find them. Read on.
Table of Contents
How to Find Files in iCloud
iCloud syncs files from one device by uploading them to the cloud to be accessible by your other devices. With this system, there are 3 ways to find files in iCloud:
- On your Mac. iCloud has a dedicated folder on your Mac that you can find on Finder’s left sidebar by default. If it’s not there, you can enable it by opening Finder and clicking Finder (on the menu bar) > Preferences > Sidebar tab and ticking the box beside iCloud Drive. You can also open the iCloud folder directly by opening Finder and clicking Go (on the menu bar) and typing ~/Library/Mobile in the field.
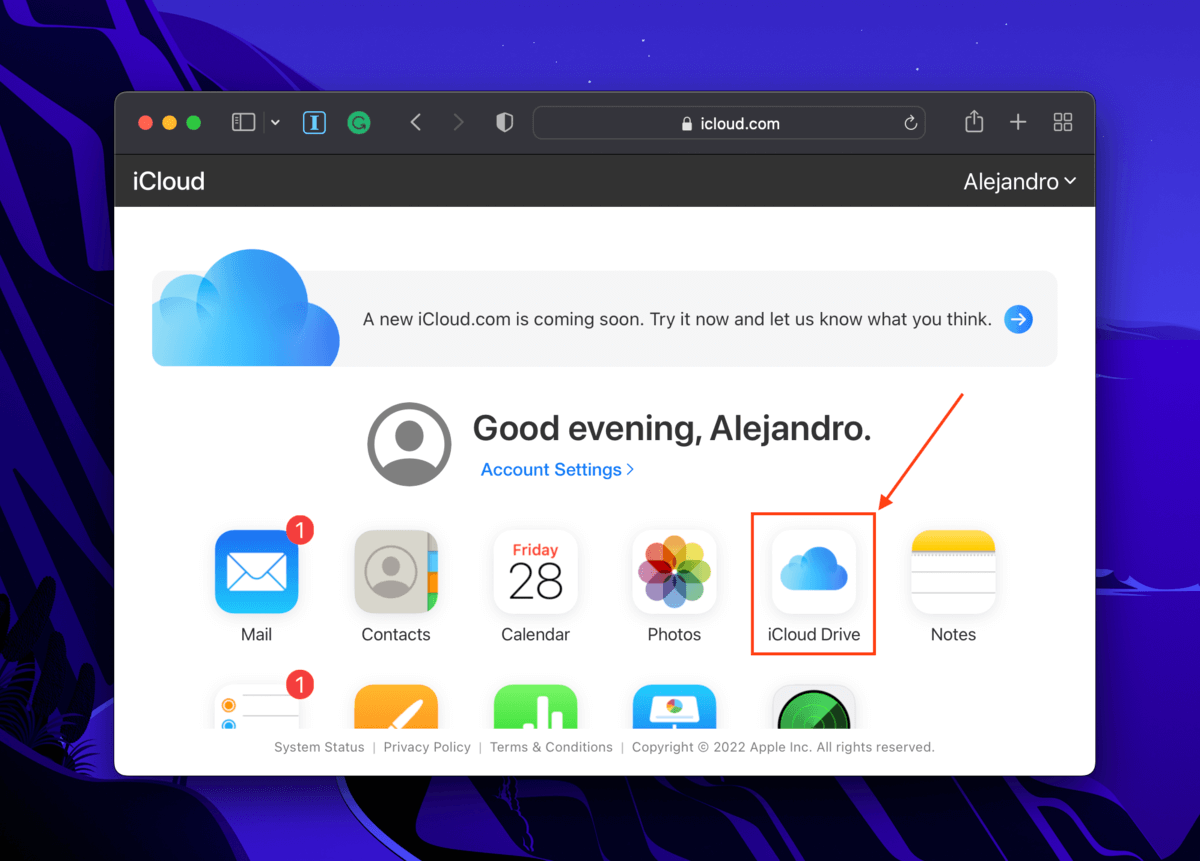
- iCloud website. iCloud files automatically get backed up to cloud storage to be accessible from anywhere, including your browser. To find them, open Safari and log in to iCloud.com. Click the iCloud Drive icon to view your files.
- On other Apple devices. If iCloud is enabled on your other Apple devices, launch the Files app and click the Browse icon in the lower-right corner of the screen to view your iCloud files.
Is it Possible to Recover Deleted iCloud Backup?
Yes, it’s possible! When you delete a file, it doesn’t get permanently deleted from iCloud. Instead, it gets moved to iCloud’s Recently Deleted folder and stays there for 30 days. In case you deleted the file directly from the iCloud folder on your Mac, it gets sent to the Trash folder where it remains for 30 days as well. During this period, you can easily restore the deleted file to its previous location – we’ll show you how to do that in the next section.
After the 30 days are up, however, they become permanently deleted. This is also the case if you delete your files from the Recently Deleted folder on the iCloud website or the Trash folder on your Mac. Fortunately, iCloud backup recovery is possible for both recently deleted and even permanently deleted iCloud files. Details below.
How to Recover Files Deleted from iCloud Backup
In this section, we cover 3 different methods to recover your deleted iCloud backup. First, we’ll show you how to restore files that still remain in the Recently Deleted folder. If your files aren’t there, we’ll show you another method to recover iCloud data using a special tool called data recovery software. Read on.
Method #1: From the Recently Deleted folder
As we glossed over at the beginning of the article, iCloud’s Recently Deleted folder acts a lot like Mac’s Trash folder. Deleted files stay there for 30 days until they are “permanently” deleted. To recover from iCloud backup:
Step 1. Open Safari and log into iCloud.com.
Step 2. Click the iCloud Drive icon.
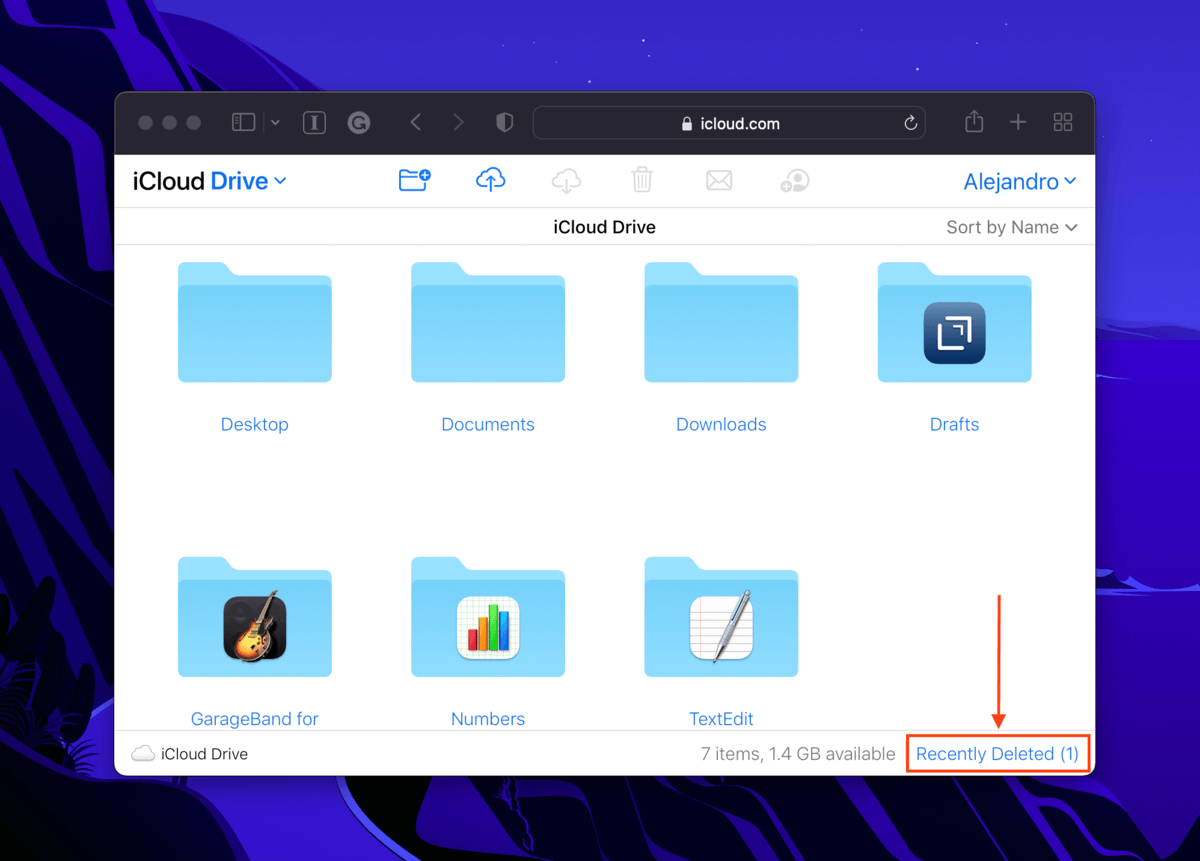
Step 3. On the lower-right corner of the screen, click Recently Deleted.
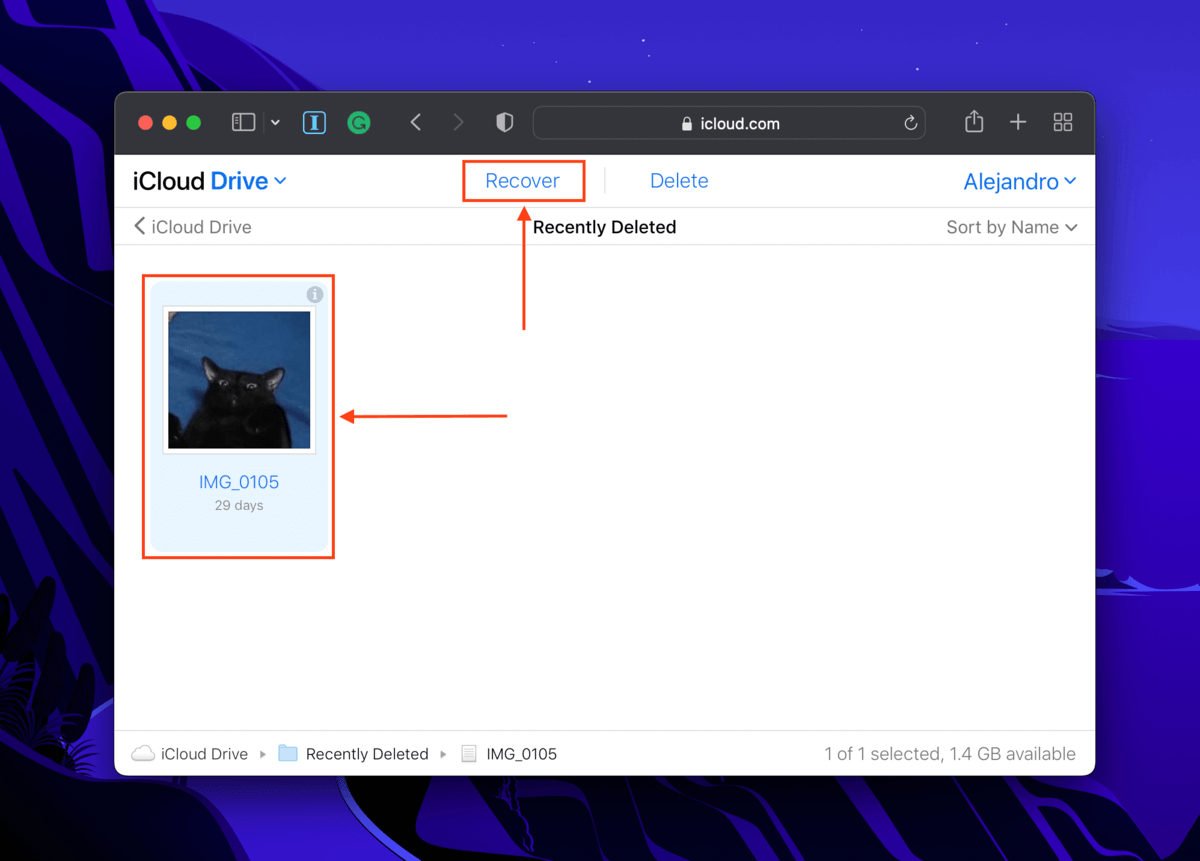
Step 4. Click the files you want to restore and click Recover at the top of the screen. You should find your file in its original location.
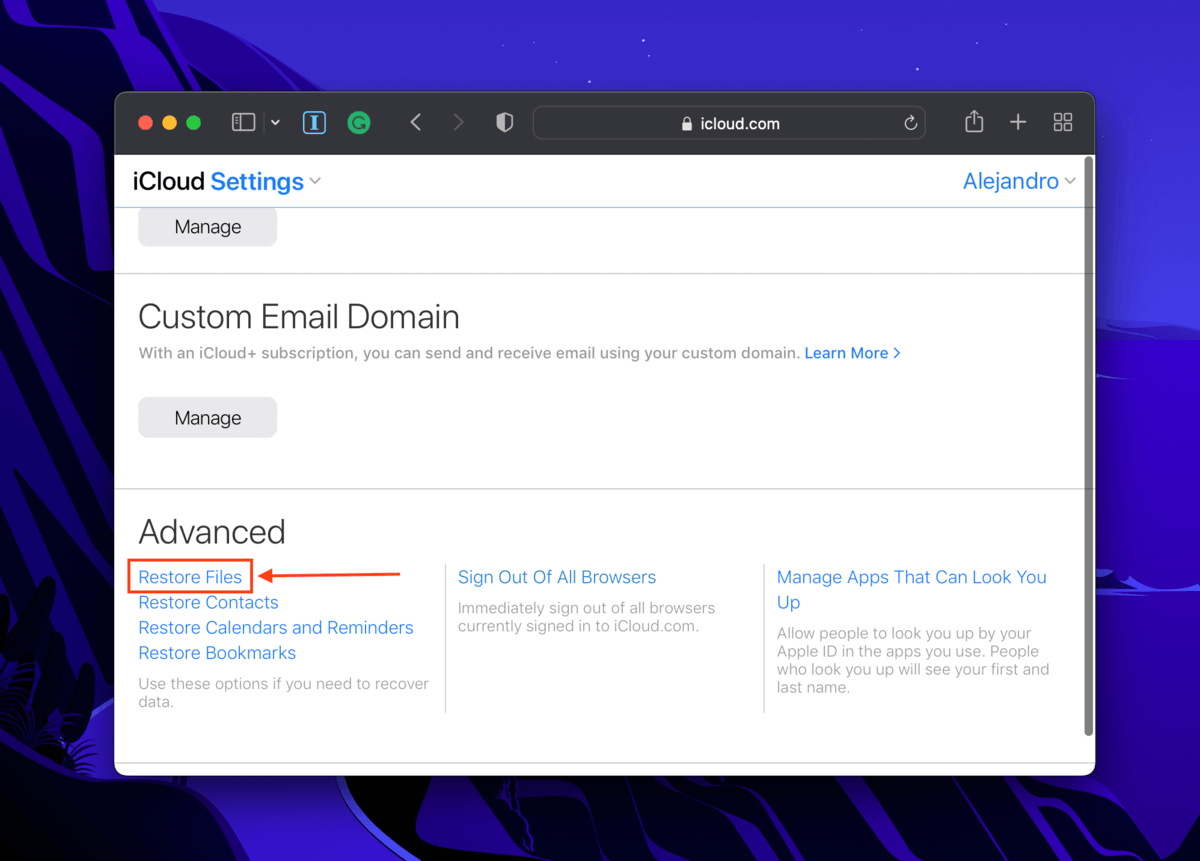
Method #2: Using the Restore Files option in Advanced Settings
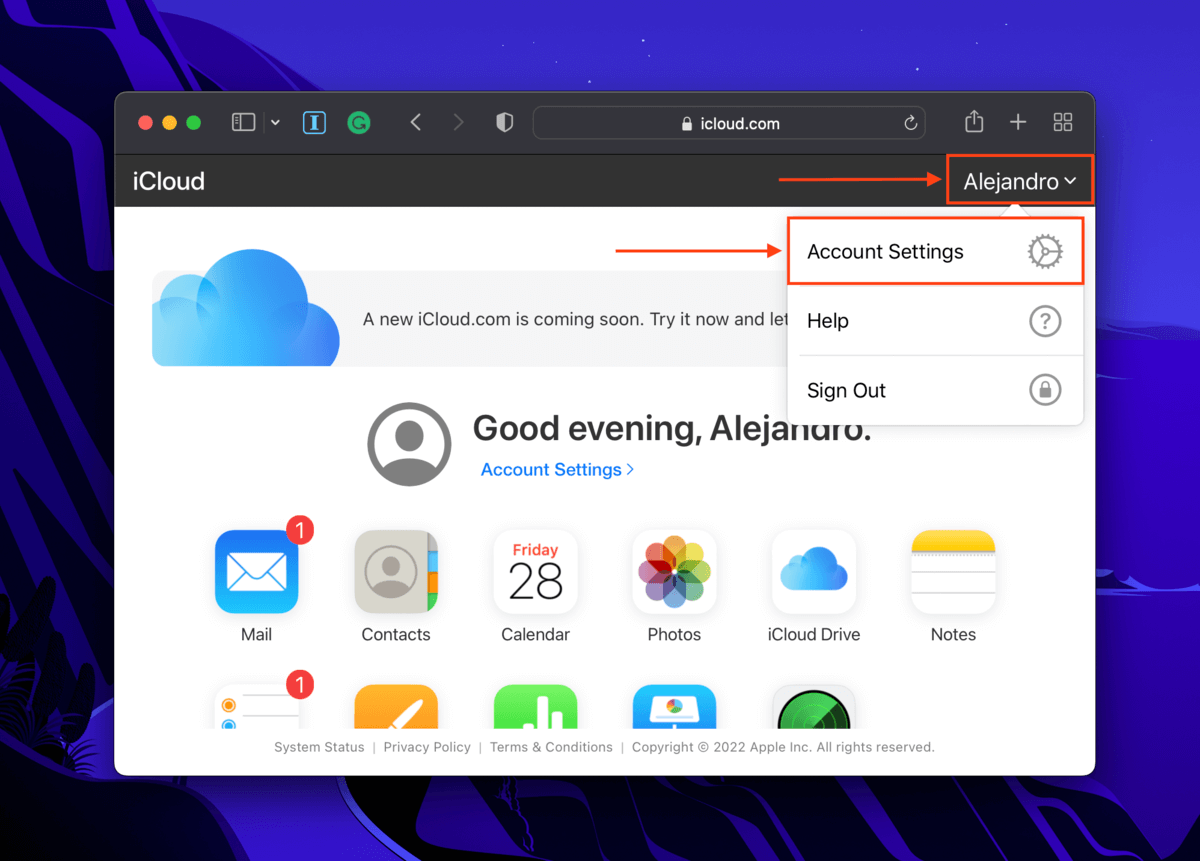
iCloud also has a built-in iCloud data recovery tool in case users delete their files from the Recently Deleted folder. Thanks to the sync function, you can also use this tool to recover a deleted iPhone backup. To access it, log in to iCloud.com, click your name in the top-right corner of your browser, and click Account Settings.
Scroll down to the Advanced section and click Restore Files (or any of the other options depending on the data you lost).
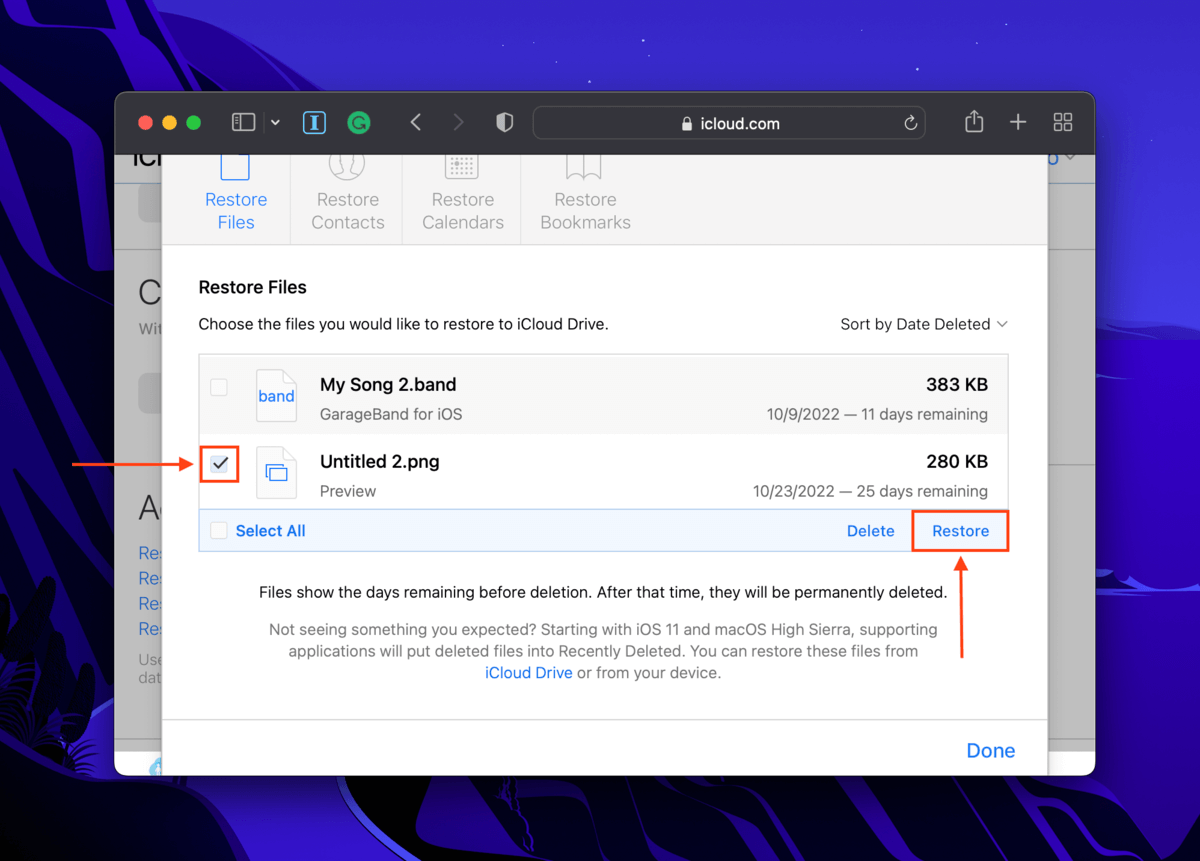
In the dialogue box that appears, tick the boxes beside the files you want to recover and click Restore. You’ll find your data back in their original folders.
Method #3: Using Data Recovery Software
If your files remain deleted after 30 days, you’ve deleted them from the Recently Deleted folder, or you deleted them from the Restore Files dialogue, you’ll need to use data recovery software. This tool can extract and rebuild data directly from your Mac’s file system as long as it hasn’t been overwritten.
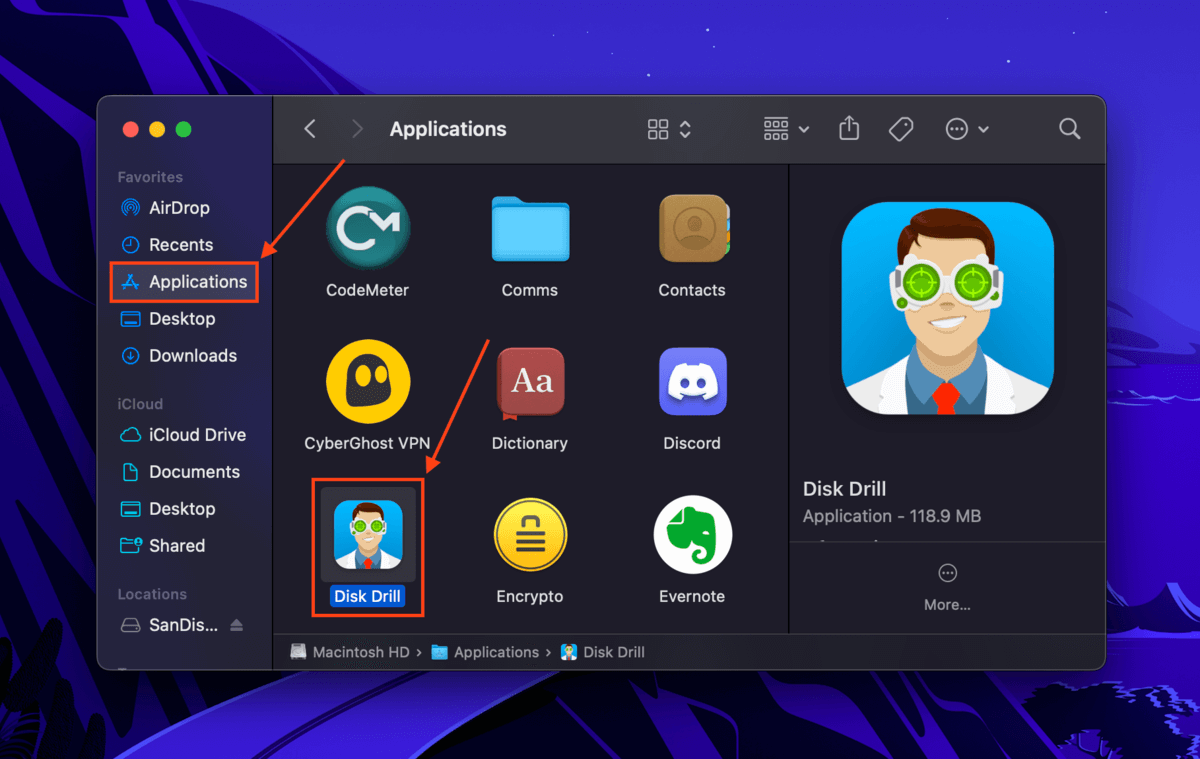
For this article, we’ll be using Disk Drill. It’s both powerful and easy to use, making it perfect for less tech-savvy users. Disk Drill also provides excellent support for macOS, so it should recognize almost any Mac-based (and even Windows-based and Linux-based) file you’re trying to restore. To recover deleted iCloud files using Disk Drill:
Step 1. Download and install Disk Drill.
Step 2. Launch Disk Drill (Finder > Applications).
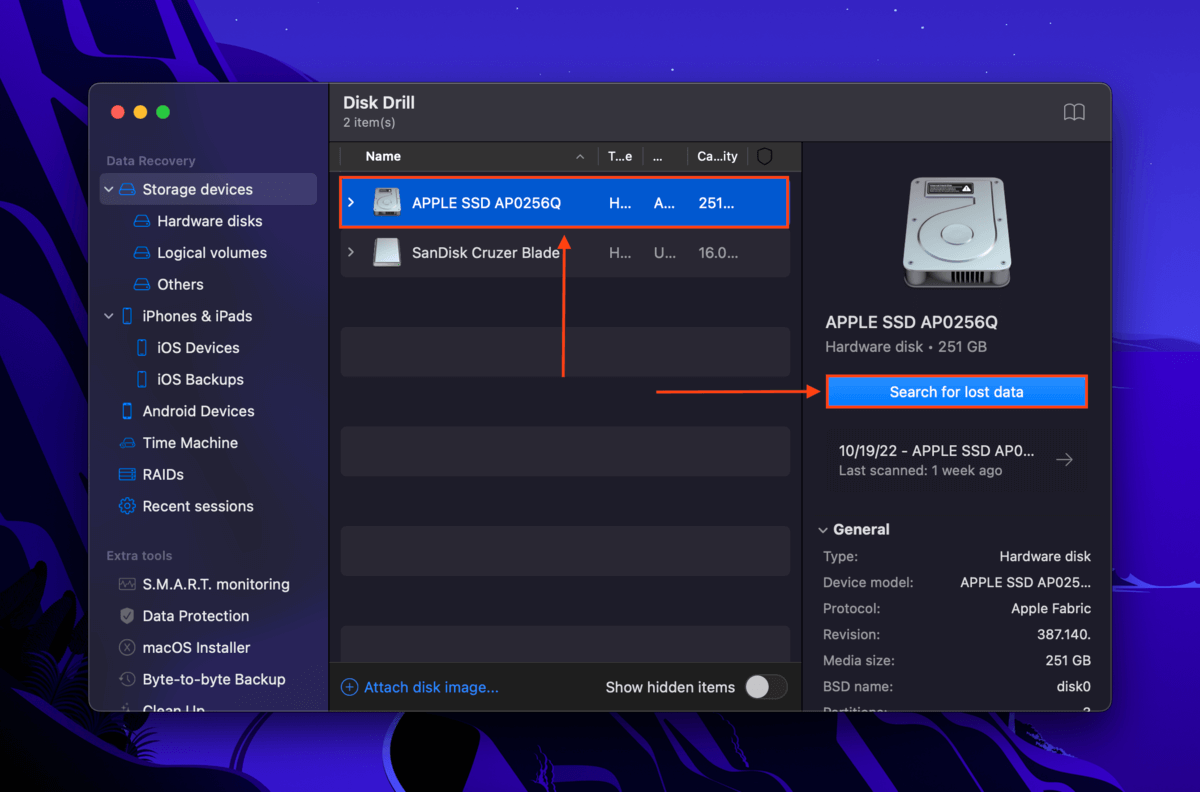
Step 3. Select your system drive (usually labeled as “APPLE SSD”) and click Search for lost data.
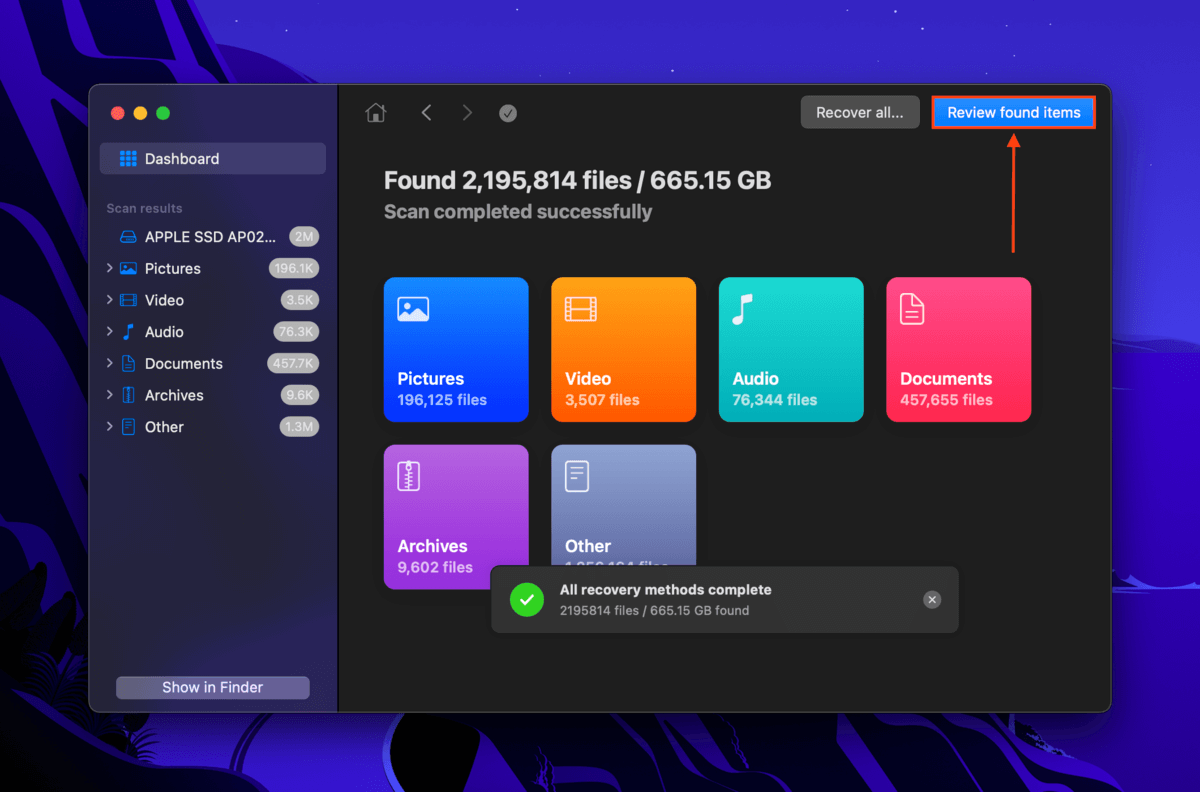
Step 4. Once the scan is complete, click Review found items.
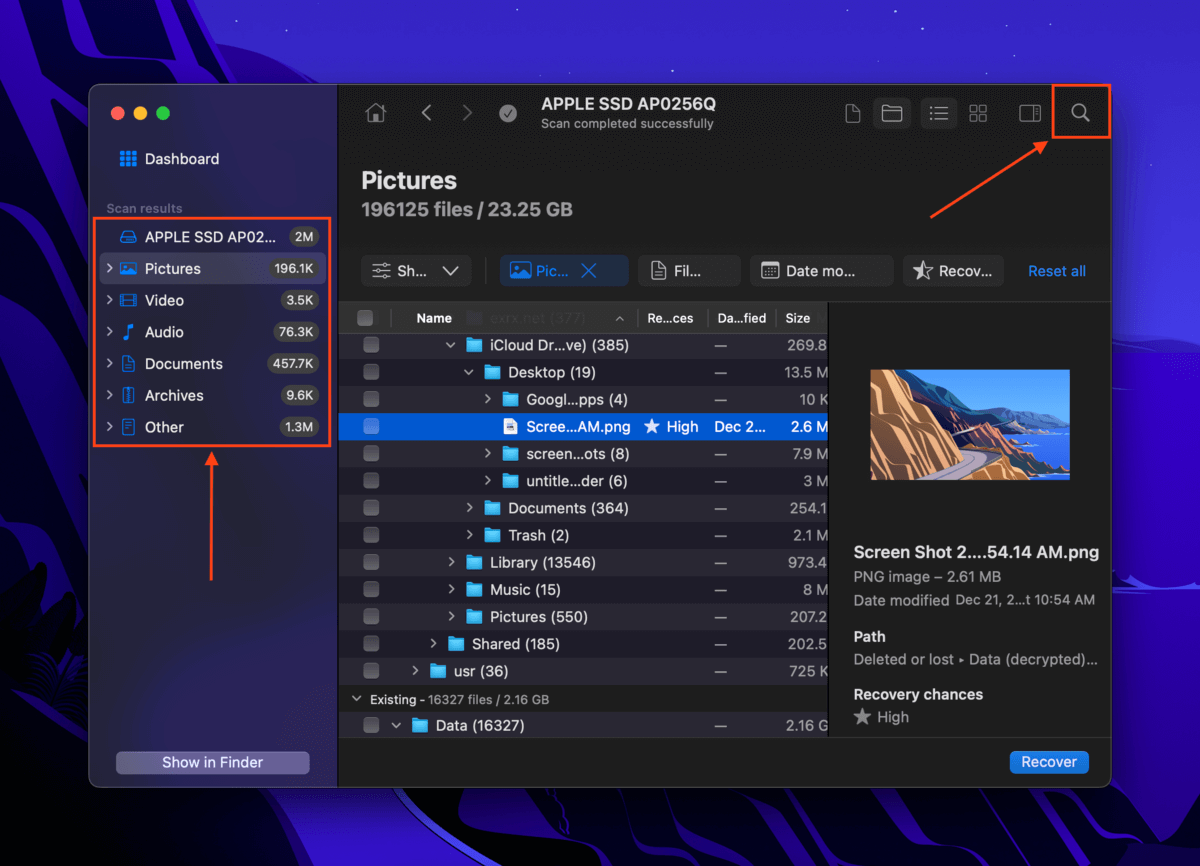
Step 5. Use the search bar (click on the magnifying glass) in the top-right corner of the Disk Drill window and/or filter your scan results using the left sidebar to quickly locate your files. If Disk Drill manages to restore folder structure, follow the folder tree (users > “username” > iCloud Drive). We also suggest previewing your file by clicking it once.
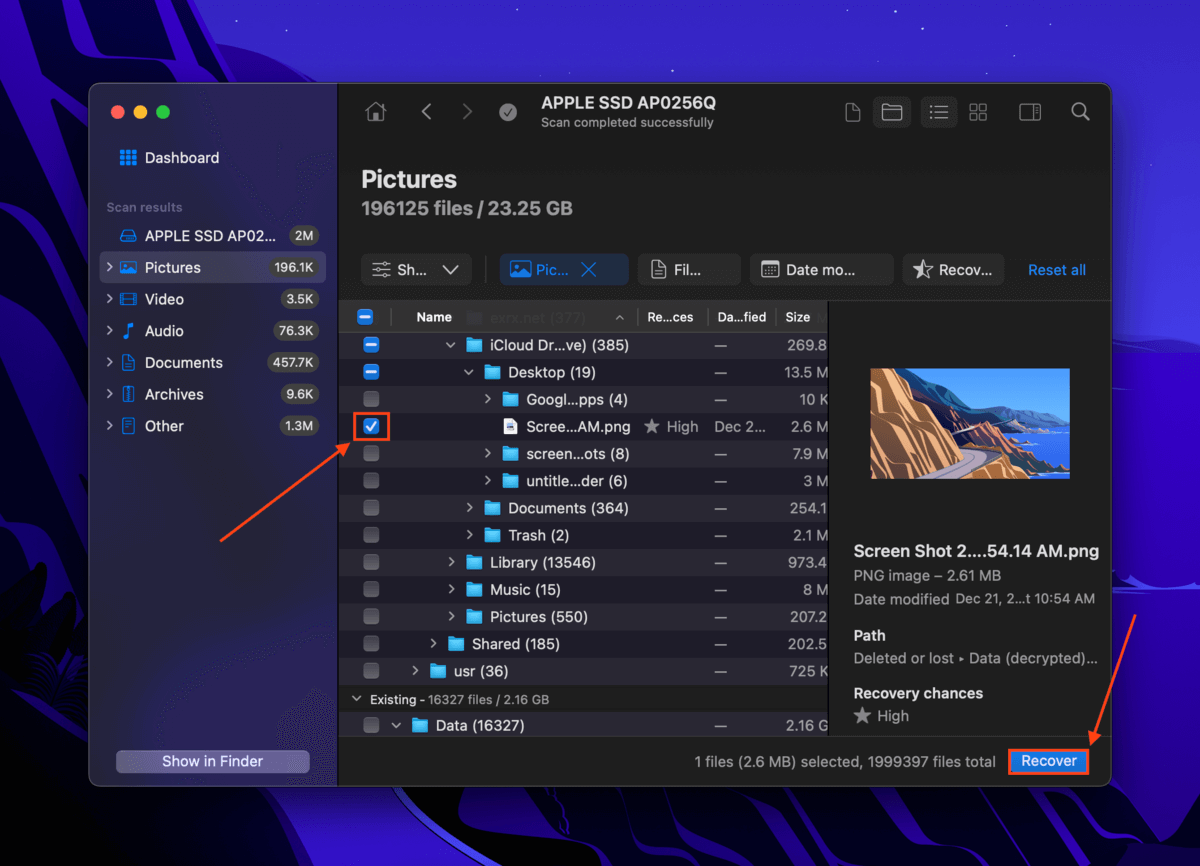
Step 6. Tick the boxes in the leftmost column to select the files you want to restore. Then, click Recover.
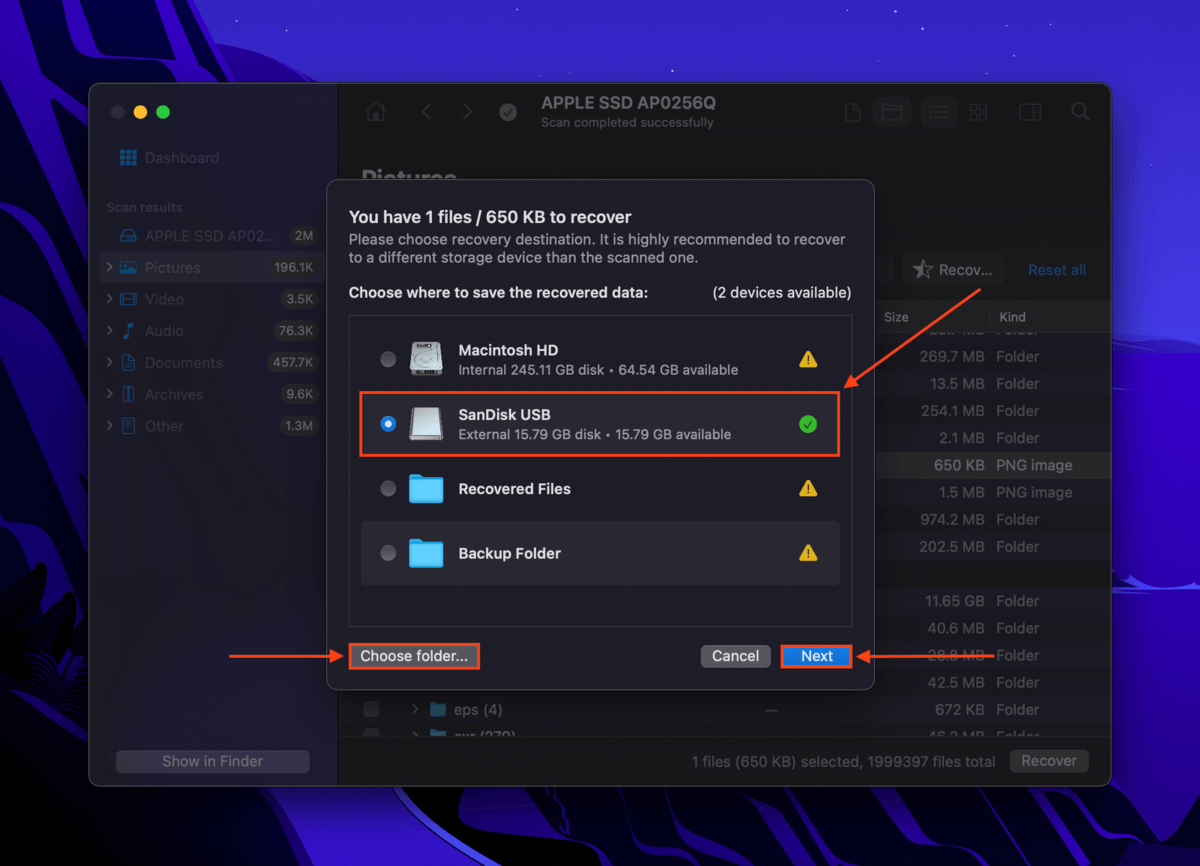
Step 7. In the dialogue box that appears, select a destination folder for the recovered files. We recommend saving them to a separate drive (like a USB) to avoid overwriting data on your Mac. Then, click Next to begin the recovery process.
Conclusion
iCloud has always been more of a sync tool than a backup tool, but it has a lot of useful features that help you secure and even restore iCloud data. Knowing how to use them (and being aware of the 30-day limits) should help you minimize the damage of losing your files. However, we always suggest using other backup tools like Time Machine to further secure your data.


